I really hate using public wifi. I hate the fact that just anyone could look at my network traffic. Call me paranoid, but it’s true. This is why I usually use an ssh tunnel for most of my work while at coffee shops or at an untrusted place. I do this using
ssh -N -f -D 8080 my.secure.host
So great, I have a local SOCKS proxy set up at my localhost now, but how do I use it? Firefox has proxy options, so that’s fine. I like a bit more control over it, so I use Foxy Proxy. Don’t forget when you do this to also forward your DNS queries through the proxy as well, otherwise a lot of this is going to be useless. You can do that in firefox with the about:config setting network.proxy.socks_remote_dns.
So this did it for me for a while. I turned off my email syncing and went happily on my way browsing. But then one day I wanted to use wget to download a file and realized that its proxy settings don’t work well with SOCKS. I searched around but didn’t really find out if it could work, but stumbled on a program called tsocks.
tsocks runs whatever program you give it as an argument, with the addition of passing any network traffic it wants through a SOCKS proxy of your choosing. It reads the details of this from its configuration file. Just set your proxy to localhost, your port to whatever you used, in this case 8080, and make sure it knows what your local network is with its settings so you can access local computers too. An example file looks like this:
local = 192.168.0.0/255.255.0.0
local = 10.0.0.0/255.0.0.0
server = 127.0.0.1
server_type = 5
server_port = 8080
And that’s it! Now just run a command like wget with it:
tsocks wget http://my.important/file
And it’s done so using your awesome, encrypted proxy. No snooping or packet modification allowed!
Posted on 12 November 2011.
Directory Switching
I’m currently taking an operating system class where we work on the OS/161 operating system. Working on it is fine, but building the operating system became a pain for one reason, and one reason only: the makefile was in a subdirectory of the operating system.
This was a pain until I figured out that make has the -C option, which changes directory before calling the build. This is awesome, because now VIM can process the output of make and I can use quickfix, as mentioned in a previous post, to jump between errors. Now, instead of just typing :make, I type :make
-C dir and everything works as expected.
Building Dependencies
Adding all of your files to your Makefile is a pain. Fortunately, if you’re working with GCC, you can use a few tricks to make this easier on yourself.
GCC provides a wonderful option: -MMD. This option creates small makefile pieces that contain dependencies for every .c file in your directory. This is great, because make actually knows how to use this to do your compiling for you!
You can use the option to generate dependency files in your makefile with a depend target. Then, to compile with make, all your targets need to do is include the files generated by gcc! Make sure to clean up these files also when you run your clean target.
Posted on 08 October 2011.
A lot of people I know use Vim, but some of them complain that Vim doesn’t have the same features as an IDE. They complain that it doesn’t seem to find compiler errors, or seem to be able to nicely search across files.
The fact of the matter is, their approach to Vim has been to view it as a text editor, and only that, when it can do so much more! Vim does have great integration with compilers and it does search nicely across many files, but first you need to know the right commands and how to use them.
Using Make
Vim has awesome support for integrating with your favourite language’s compiler or lint program. Many file types come with awesome integration in Vim already, while some are rather agnostic about what you want to use. There are a few magic options and commands that you’ll want to use to get Vim acquainted with your preferred environment:
-
The :compiler command can tell Vim which compiler or lint program you’re going to use. This tells Vim what format the error messages are going to be in, as well as setting a few other options Vim needs to know about. These files can be written on your own, but Vim has a pretty nice collection of them already in $VIMRUNTIME/compiler. If you’re using Java, for example, you may want to use :compiler ant to tell Vim you’re using Ant as your build program.
-
The 'makeprg' option tells Vim what command to run when you use :make command (more on that later). Using the same Java example, you’ll want to set this like so:
set makeprg=ant
You may have to use a full path to Ant if the program is not in your path.
So now you have introduced Vim to your compiler or lint program. They’re getting acquainted, so it’s time to take their relationship to the next level. To do this, use the :make(-out? Ha-ha.) command. If everything has been set up right (except your source code - you need to actually have a compiler error or warning), you should see Vim magically take you to the first error or warning the compiler found. YAY! Vim is now doing something useful!
It would be crazy to think that Vim would make you recompile with :make every time you want to see the next error, so now we get to use :cnext and :cprev to go through the error list. Every time you use one or the other, Vim goes to the next (or previous) error in the error list and gives you the error message at the bottom of the screen. You can then fix the error as you see fit.
This is fine and all, but what if you want to see all of the errors. Well, this is where the quick-fix list really comes in to play. The :cwin command opens a special, new, un-editable window. This window displays a list of all your compiler errors with line numbers and possibly character positions. You can move around the buffer as usual, but when you pres enter, Vim jumps to the error your cursor was on! Now you can view all of your errors, and pick out a specific error’s position if you need to. Isn’t that awesome!?!?!
Don’t Forget Grep Too!
Vim doesn’t just use quick-fix’s awesomeness for compilers, though! Vim also let’s you do this with grep.
The relevant option is 'grepprg'. Vim gives you two commands to use grep, though. One runs the external grep program that you set with the 'grepprg' option - :grep. The other is :vimgrep. While they both behave the same way on the surface, the first is usually faster. This is because :vimgrep actually uses an internal procedure within Vim to search all of the files, and it’s not quite as fast as the actual grep program. You can use either like so:
:[vim]grep /pattern to search/ file
There are a few things to note: * The pattern can use all of Vim’s regular expression goodness if you use Vim’s internal grep. If not, all of grep’s regex rules apply. * The file can be any file name, or a glob. Pro tip: use something like **/*.c to glob for all C files recursively through the whole directory tree when using Vim’s internal grep. With the external grep, you can use any options that grep normally has inserted before the pattern, i.e. :grep -r
/pattern/.
Odds and Ends
What if I want multiple lists?
If you want to have multiple lists, you want to use Location Lists. These are basically the same as quickfix, except you can have one per window. The :lmake, :lgrep, and :lvimgrep commands will do the same as make or grep, but use a Location List instead.
Do I have to type the commands every time?
Nope, I would suggest you map them in your ~/.vimrc somewhere, or use an awesome plug-in like Vim-Unimpaired by Tim Pope.
What if I want to get an old quick-fix list back?
You can use commands like :colder or :cnewer to go backwards and forwards in quick-fix history.
What if I already have the errors in a file or buffer?
The command :cfile filename loads a list from a file. :cbuffer loads a list from the current buffer.
Help! I’m lost!
Vim’s help for the quick-fix and location lists is available by using the command :help quickfix. Good luck!
Hope you found this information useful. Vim is an absolute joy to use once you figure out a work-flow that works for you. Take some time to get to know some of the features it has that make your life easier and you’re well on your way to enjoying happy, productive coding with Vim.
Happy Vimming!
Posted on 19 August 2011.
Git is awesome. ZSH is also awesome. Why can’t they work together!?!?! The truth is they can! Introducing my ZSH prompt with git info!
The magic all begins with one awesome line in your ~/.zshrc:
autoload -Uz vcs_info
This one line gets you all the ZSH goodness to get info about the git repository you’re in right inside your prompt. The rest is just telling ZSH how you want it to show you the info.
# give us some awesome colour stuffs
autoload colors zsh/terminfo

# style the git messages
zstyle ':vcs_info:*:prompt:*' enable git
zstyle ':vcs_info:*:prompt:*' check-for-changes true
zstyle ':vcs_info:*:prompt:*' use-prompt-escapes true
zstyle ':vcs_info:*:prompt:*' stagedstr '%F{green} staged %f'
zstyle ':vcs_info:*:prompt:*' unstagedstr '%F{yellow} unstaged %f'
zstyle ':vcs_info:*:prompt:*' actionformats "(%s:%b%u%c - %a)" "[%R/%S]"
zstyle ':vcs_info:*:prompt:*' formats       "( %F{green}%s%f:%F{14}%b%f%u%c )" "[%R/%S]"
zstyle ':vcs_info:git:prompt:*' formats       "( %F{red}git%f:%F{14}%b%f%u%c )" "[%R/%S]"
zstyle ':vcs_info:*:prompt:*' nvcsformats ""

# make sure ZSH knows about git before it shows the prompt
precmd () { vcs_info 'prompt' }
I prefer to have the information about my git repository on the right side of my prompt. If you didn’t know ZSH could do this now you do!
# set the prompt to show git stuff!
RPROMPT='%B${vcs_info_msg_0_}$b'
If you copy and paste this directly, you should get something that looks as awesome as this:
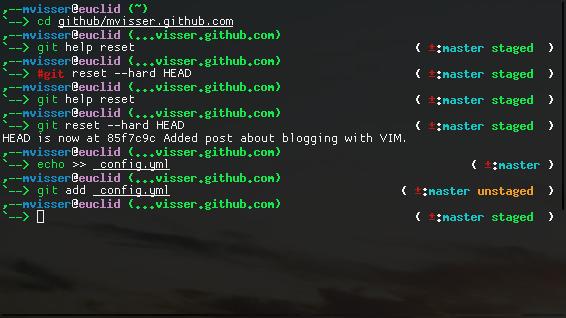
How’s that for class. Useful and elegant. It also contains information if you’re resolving a merge conflict or editing during a rebase, but since those situations are a little harder to reproduce, I think I’ll hold off on the screen-shots for now.
Happy hacking!
Posted on 20 July 2011.
Recently I’ve had to rescue a few of my friends’ Windows machines from one problem or another. To do this, I started using a rescue kit name Trinity Rescue Kit. This rescue kit is a live CD of a Linux distribution packed with everything you would ever want when trying to restore a system. Some of the things I’ve used are:
- Windows password reset
- Disk copies
fsck
But it can do much more! You can host a file server with the live CD, do a virus scan, and host an ssh server. The documentation is included on the disk, and you can view it with links in a frame-buffer console that will show the images and everything as well! This is definitely going to be my go-to rescue disk from now on.
You can use TRK (Trinity Rescue Kit) from a live CD or from a bootable USB drive, which makes it even better.
Windows Resuscitation
Trinity offers many options to help restore a Windows system to a working state. It is, however, incapable of restoring a hard disk partitioned as NTFS due to limitation of the Linux driver for NTFS. While this is sad, it does have utilities to clean up junk files, assembly cache, and perform an anti-virus check. It can also make duplicates of a drive, or try to restore files, which is always handy.
Another wonderful feature is that it can reset windows passwords for Administrator and any other user. This is helpful if you have forgetful room-mates ;). While the password change didn’t work for Windows 7 for me, blanking the password did - you can always log in and change the password once you have access anyways.
Restoration With Style
TRK has some pretty awesome boot graphics. I noticed that it was using a frame-buffer console with a nice background including its logo. It also uses the graphical console-only version of links on the frame-buffer console, which means that the documentation can even show screen shots. This makes it so much nicer to work with TRK.
How Do I Get It?
You can get TRK from the homepage. You can download an executable that will burn TRK right to a CD or DVD in Windows or you can burn it to a cd on linux with
$ cdrecord device=/dev/cdrom trinity.iso
The exact command will vary depending on your version of cdrecord and the device your CD drive is.
The documentation for TRK also has a handy guide on how to get TRK to a USB drive here.
Pro Tip: Visit hak5.org at this page or this page to create a multiboot USB with all of your favourite live distros on one drive!
Posted on 17 July 2011.